Review - Aeros Myth 3 Harness
Introduction
I have never considered myself particularly flamboyant, so after almost 15 years flying with the same harness, and perhaps my aging expanding body seeking that extra comfort, I decided it time to purchase a new harness. I don't fly nearly as much as I'd like, so couldn't justify the purchase of the highest specification and best performing harness available. That said, Aeros' range of harnesses are very competitively priced and feature some very useful features found on some of the top end harnesses. After several evenings reading on the web, I opted for the Myth 3, Aeros' latest iteration of this popular harness aimed at the sport/recreational pilot that also seeks a bit of performance.
Ordering
I'm UK based so FlyLight in Northampton, the distributor for Aeros for the UK, was my first point of contact. Having gained my aerotow endorsement with FlyLight, the staff were already familiar to me. Ordering was pretty straight forward as Stewart Bond supplied me with the standard Aeros order form (shown below). I completed this with support of many friends and family (lots or measurements, re-measuring and averaging!). The harness was being custom made which meant I choose colours that would match my AirBorne Sting 3 hang glider (edit: the colour scheme of my Wills Wing U2 I own now was chosen to match the harness!). There are various options when ordering, colours, Velcro secured zips, tow points for aerotow and winching and I opted for them all. Once completed, the form was emailed to Stewart and shortly followed up with a courtesy call to check the details entered.
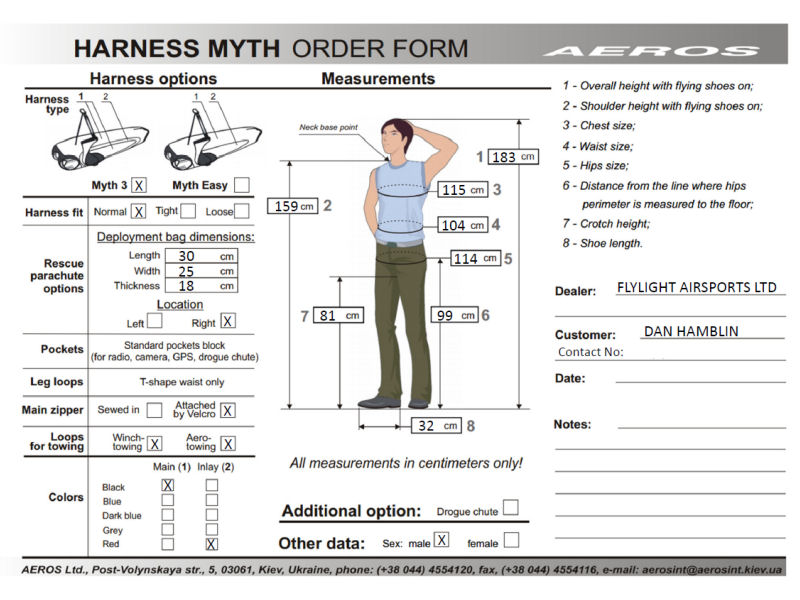
With the help of many measurements by friends and family, I am able to complete my Aeros Myth 3 order form.
9 Nov 2013
Delivery
Shortly after I had submitted my order the Carbon Crossbeam Issue affecting Aeros Combat Hang Gliders was in full swing. Understandably, this had an adverse effect on my order and the 4-6 week lead time significantly increased.
Eventually my patience was rewarded and a brand new shiny Aeros Myth 3 harness had arrived at FlyLight and awaited my collection. Weekends were best for me to travel to FlyLight and Stewart accommodated this and met me on a Saturday morning to introduce the harness to me.
The Harness
The harness I had been flying with since, well, forever, had a front loaded parachute and could only be adjusted at the shoulders (by a bit of string and a knot!) - it was pretty basic but functional and had seen me well for many years! The Myth 3 in contrast had clips, adjustable bits of string, an aluminium frame, bungees and something called a butt lever! Steward cautioned that I would feel like I was hanging much lower having been used to a front loaded chute and the Myth 3 having a side mounted one!
First course of action was to put the harness on and my initial impression was that it was much heavier than I was used to and with the aluminium frame, felt a little cumbersome. Unlike my previous harness, this harness could be attached to the glider before the pilot slips into it. I believe this is often referred to as the Aussie method and is achieved with detachable leg loops. To get into the harness the pilot slips their arms through the arm holes, passes each leg strap between their legs and fastens to the waist T-buckle at the front. A second buckle secures across the chest. The harness is then zipped downwards from just below the neck to just above the waist. A second zip allows for your legs to dangle for take-off and landings and is zipped upwards by pulling a cord once your legs are securely retracted into the harness. All the zips ran smoothly and didn't get snagged - a good start!
My very first impression when wearing the harness was it felt tight - perhaps I had put on weight since I was measured! Once in the harness I noticed the length of it was much longer than I was used to and the fabric much stiffer and less flexible than my previous harness. As I walked around the FlyLight workshop, my new tail clattered and bashed items as I moved to a hang point - it was going to take a bit of getting used to. I noticed that the harness dragged along the floor due to the extended tail which houses a useful tail compartment (big enough to take my glider bag and packing material). Aeros have cleverly added a detachable (I think it's leather or a manmade hardwearing fabric) cover to the end of the harness to protected it from wear. I emphasise 'detachable' as it will eventually wear thin and need replacement (especially if walking around on an abrasive surface like concrete). I'm sure spares can be purchased but I haven't yet enquired about this.
Once I was attached to a hang point I was able to dangle and move into prone. By pushing on the footplate a slider is pulled backward enabling the harness to move further into prone. The position of this slider is adjusted by adjusting the length of the cord that attaches the slider to the footplate. This can only be done on the ground by accessing the internals of the harness and trust me; it takes some playing around with to get the lengths right.
Steward briefed me on the pitch adjustment (using that before mentioned butt lever) and the best technique for getting back upright from prone (climbing up the uprights). Stewart warned that I would find this a little different compared to my last harness and advised I practice before my first flight.
The angle of dangle (head up/head down position) can be adjusted in flight using the butt lever. This is achieved by the pilot supporting their weight on the base bar then operating the butt level by, you guessed it, pushing your butt upwards. This releases the pitch cord and allows the pilot to angle more downward. Once the required angle is set, the butt level is released to lock the pitch cord which prevents further head down dangling!
Ground Handling
After several evenings dangling from the garage roof I was ready for its debut flight. Firle was my chosen site and with a lovely smooth northerly wind, it was perfect. I had now adopted the Aussie method (attaching harness to glider then attaching myself to harness).
The first major difference I noticed was my inability to get under the uprights to enable me to lift the glider. The aluminium frame in the Myth 3 prevented me from doing this. John Mc chuckled as he watched and directed me to the technique that all other pilots use - lift the glider up onto the keel so you can get your shoulders under the A-frame, then manoeuvre as before. This was a little alien to me as my previous harness allowed me to get my shoulders under the uprights before lifting the glider. After a few flights it's now become the norm, and feels perfectly natural!
Hill Launch
Once I had made my way to launch I was ready. John Mc assisted me to launch where we completed a hang check and I was ready. As I began my take-off everything seemed familiar and normal, right up to the point where the glider seemed to float higher and higher above me without that re-assuring tug between my legs wanting to pull me off the ground. For a few terrifying moments I thought I hadn't secured my legs loops (my previous harness had no buckles so as long as my legs were through the loops, all was good, but the Myth 3 had something extra that I hadn't had before - detachable leg loops!). Just at the point when I thought I was in real trouble, I felt that expected tug between my legs then remembered Stewart's words that I may find it a little different not having a front loaded chute! Hell yes, I hung almost 10 inches lower than I was used to. Everything was now unfamiliar and my reference points between myself and the glider were in need of re-calibration (not an easy thing with almost 15 years flying gliders in the same position).
I continued to run down the hill and transferred one of my hands to the base bar (it seemed very close) in this new hanging configuration. Eventually the glider lifted me off the ground and I moved into prone. I found this surprisingly easy as it required next to no effort on my part. As I swung my legs up behind me, I easily found my way into the harness without getting caught up on anything. I then flew around getting used to the new hanging position under my glider before I zipped up my legs.
Winch Launching
Please come back later - I haven't winch launched the Myth 3 yet!
Aerotow Launching
When ordering the Myth 3 I opted for both aerotow and winch tow points. The aerotow points are positioned at shoulder level and consist of two loops, which, if need be, can be tucked away in the harness when not used. It's easy to fit a barrel release and the position of the tow points is ideal for aerotowing. My aerotow launches are normally from a launch trolley - one thing to note; the cord for zipping the harness up does dangle below the harness. To avoid risk of it snagging on the trolley during launch, I had to secure the loose loop of the cord by tucking it into the parachute pocket. During my initial aerotows (see 8 Jun 2017) , the harness was comfortable and did not slip around my body. In fact, from the harness perspective, I didn't notice anything about the harness which meant I was able to focus on the actual tow itself.
Flight
In prone I noticed something I hadn't expected - comfort! The aluminium frame in the Myth 3 supported my body in a way that my previous harness had not. In addition to this, my visibility was very much improved - how you may ask? Well, by having a single suspension point, it's very easy for the pilot to pitch around so by gently pushing on the control bar, I found I could raise my head slightly. When flying in traffic, I found this to be a very positive thing.
In prone, I was very close to the control bar but and was able to pull my body through the control frame to accelerate the glider and still remain clear of it (although there isn't much space between my chest and the control bar; not a fist gap as I had been trained to expect!). There was no need to consider adjusting the hang loop, everything was just about right (both on my AirBorne Sting 3 and Wills Wing U2 - fitted with a DHV hang loop).
Control of the glider felt very natural and I noticed the glider response had improved. I assumed this was due to the fact that I was hanging lower. The single suspension point made it easier to twist so any low airtime pilots need to ensure they avoid this for effective control of the glider. I did not feel restricted in anyway with this harness and very much enjoyed flying around the sky in it.
My first flight in the Myth 3 lasted well over an hour which is a credit to the comfort of the harness. I could feel a little pressure from the chest buckle but this wasn't at all uncomfortable. Subsequent flights since had all been 45 minutes or more and have all been comfortable; testament to the comfort of this harness.

This is the cord that is pulled to zip up the bottom zip to secure the pilot legs.
20 Jun 2015
Landings
My first series of landings in the Myth were either top or low wind bottom landings. My first was a top landing that almost ended in disaster. I found it exceptionally difficult to get upright especially when trying to get my second hand up to the upright. In my attempt to do so, the harness twisted me away from the upright which forced me to really stretch and reach backwards for the upright. In doing so I popped the nose of the glider and almost stalled!
In subsequent landings I experienced some painful nut crushing as the leg loops (should really say loop as this is the point where the loops come together at the T-buckle); are positioned in just the wrong position for my male anatomy. During one top landing at Bo Peep I was physically pulling myself up on the uprights to relieve this pressure! Squeak!
During some of my bottom landings I experienced similar issues and again struggled to get up on the uprights. One time I even hooked my left arm behind the rear wires of the glider resulting in an inability to flare! Imagine the ground speed! Eventually, on a particularly challenging windy day at the Devil's Dyke my luck ran out and after again getting my left arm hooked up in the rear wires, I crashed the glider in quite spectacular fashion. Fortunately, I was able to walk away with only damaged pride, a broken control frame and right leading edge on the glider.
These events forced me to review everything from the new harness and my technique. I used video footage that I had captured from previous flights and observed some fundamental failings with my technique (not the harness!). The key failure was that I was so used to my previous harness that I simply knew where the uprights were so never bothered to spot them (call it muscle memory if you will). There was no conscious thought with what I was doing to get my body into a landing configuration - I had become unconsciously incompetent! Introduce the new harness, dangle a little lower than I was used to and I was totally un-calibrated! Something had to change - I was at fault and needed to do something about it!
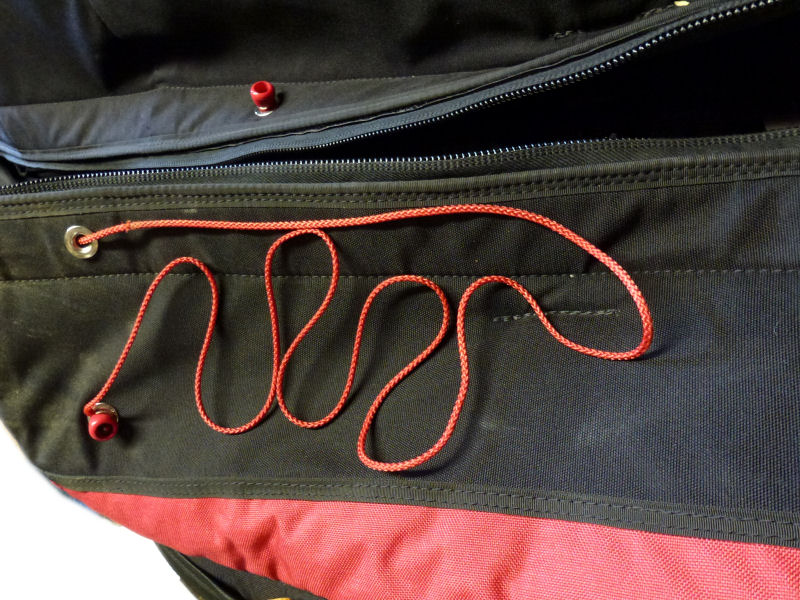
This cord is pulled to zip down the bottom release to free up the pilot legs for landings. The cord is attached to a bungee to ensure most of the slack is pulled in but enough is free for the pilot to easily locate.
20 Jun 2015
Corrected Landing Technique
I write all this simply because with a harness like the Myth, there are some fundamental things to get sorted to fly with it correctly. It's a harness with plenty of bits that can be adjusted and you need to get them right! Having flown with an early 90's Flylight harness with no aluminium suspension system and next to no adjustments, the transition to the Myth 3 was far more significant than I had realised - changing up to a higher performance glider had been a lesser issue in comparision! What follows is what I believe to be the correct sequence of events when preparing for a landing:
Deployment of the landing gear is fundamental; on the Myth a huge dangly cord is easily located (even without looking) around the upper thigh area. Once pulled the bottom zip zips down allowing the pilots legs to be deployed. I do this before I have even started my approach. I normally wear gloves and have absolutely no problems locating this cord.
Once the legs are free and with a gentle push on the control bar to lift my body, the slider on the rear of the harness where the suspension point is secured 'should' (see comments later) slide forwards/upwards allowing the harness to pitch up. When the pilot is ready, the pilot should transition to the uprights by first spotting where the right or left hand is going to go then placing it, then spotting where the remaining hand is going to go and placing it. With the Myth, I have found it best to first grasp the bottom of the uprights and to slowly climb up to achieve a more upright position while at the same time maintaining, full control of the glider.
Finally, it's best to allow your legs to dangle behind; drawing them forward has two notable consequences - firstly it moves the centre of gravity forward which is not desirable for nil wind landings where a good flare is required, but secondly, the Myth will try and crush your crown jewels (if the leg loops are not perfectly adjusted and positioned). Perhaps this is a safety feedback mechanism that Aeros have designed in to the harness.
Subsequent top landings and nil wind bottom landings since adopting this technique have been completely without event and I have now become very comfortable with the Myth 3 from Aeros.
The side pocket opened with one of the bungee cords pulled out. These are used to safely secure the pocket contents and yet make them available in flight.
20 Jun 2015
Conclusion
The Myth 3 is not as friendly as I had expected, but in defence, I was used to a very simple and less comfortable harness! In flight I have found the Myth 3 to be exceptionally comfortable. Transition from an upright position into prone happens without conscious thought although getting back up on the uprights in preparation for landing does need practice and should be done well in advance of an actual landing!
The pitch adjustment works pretty effectively, although I have found that the slider on the rear of the harness sometimes seems to get caught and requires a little wiggle/jiggle to allow it to free up and slide towards the head ready for landing. I haven't quite worked out why this is yet, but hypothesise it's because the plastic slider's diameter is slightly too large compared to the aluminium tube that it slides along allowing the slider to twist and lock itself (more on this when I've figured it out). I use a silicon based lubricant regularly to keep this running as smoothly as I can.
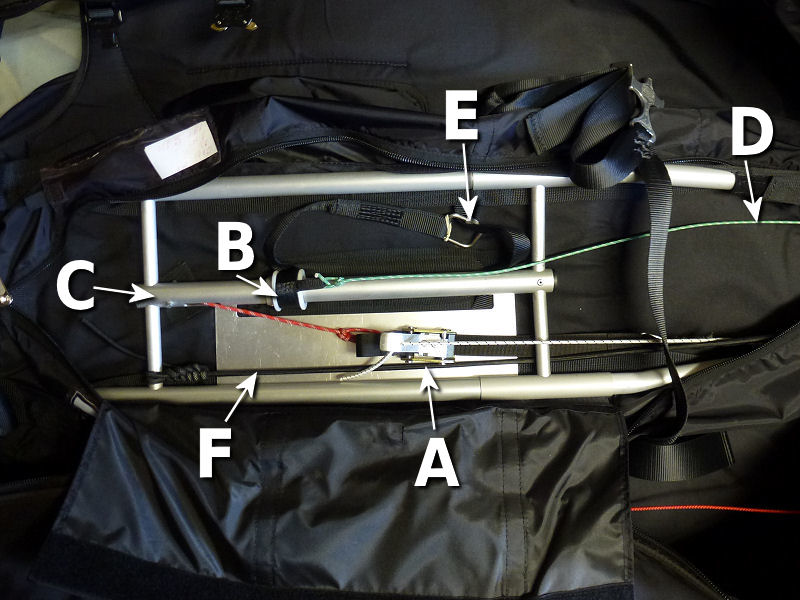
The inside of the Myth 3 harness opened up to expose aluminium frame. A: butt level, B: slider - this is where the hang point slides back and forth, C: Harness frame (head end) and red pitch adjustment cord routing to butt lever, D: Foot plate cord; used to pull the slider aft when pilot moves to prone, E: safety attachment in case frame fails, F: pitch adjustment return bungee.
20 Jun 2015
Storage space is fantastic and I was pleased to discover I can get my entire Wills Wing U2 glider bag and padding into the tail compartment. There is a further pocket on the side, accessed via a zipper where radios etc. can be stored. This pocket also contains a number of bungee cords that attach to the pocket inner with the free end used to secure things like a radio, GPS, camera etc. Provided you've connected everything safely to these bungees, you can access items within the pocket during flight without fear of losing anything.
There is also a separate compartment for a drogue chute - just behind the main equipment pocket. This comes with a brightly coloured handle; however, I don't use a drogue so have removed this to avoid confusion between the drogue handle and the actual chute handle that are both coloured a bright yellow (Aeros - perhaps each handle coloured with different bright colour would be more sensible?).
There is nowhere for a hydration bag such as a camel pack - I did wear one once but as soon as I was zipped in the harness, the camel pack quashed flat and resulted in a fountain of water spraying everywhere. Yes, I looked special at the Devil's Dyke when I did that!
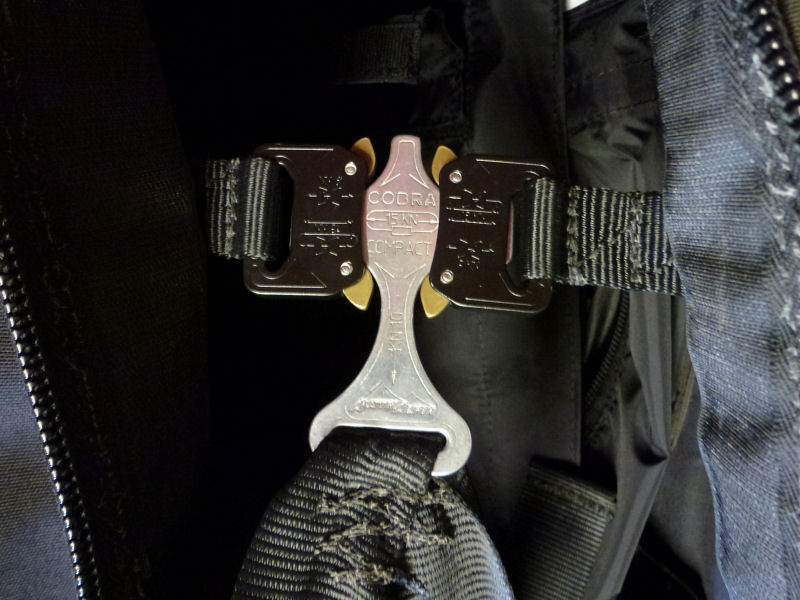
This is the quick release T-buckle.
20 Jun 2015
The T-bar system used on the leg loops can result in a single nut crushing strap that squashes the crown jewels when all your weight is supported by the leg loops. I've found that careful lengthening of one leg loop to ensure an offset to one side results in better comfort; it's taken a few painful experiences to find the right adjustment. My previous harness used two separate leg loops which left room for the before mentioned jewels (see photo below). I can only conclude this part of the harness was designed by a woman but it does facilitate the use of the Aussie method which I have found to be a welcomed addition to my flying vocabulary.
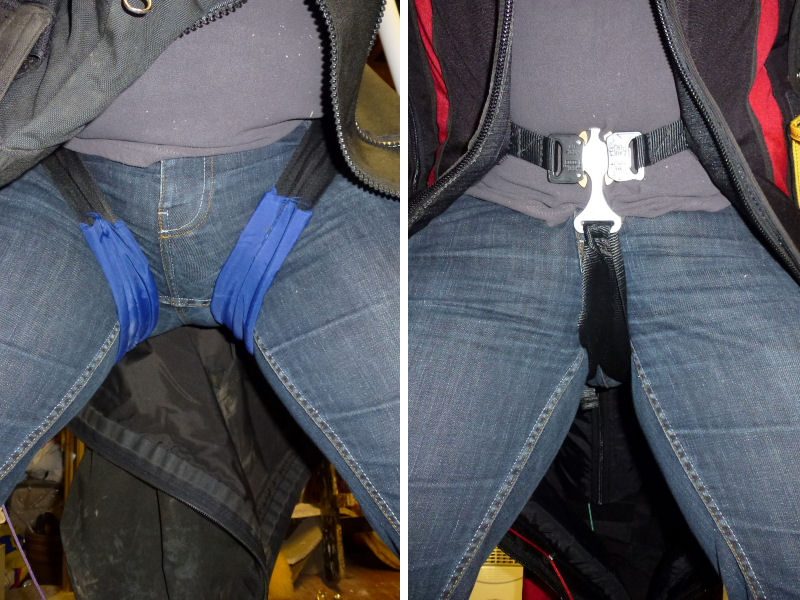
Photograph showing the difference between the leg loops of my old Flylight harness (left); and the potentially nut crushing leg loops of the Aeros Myth 3 harness (right).
6 Dec 2013
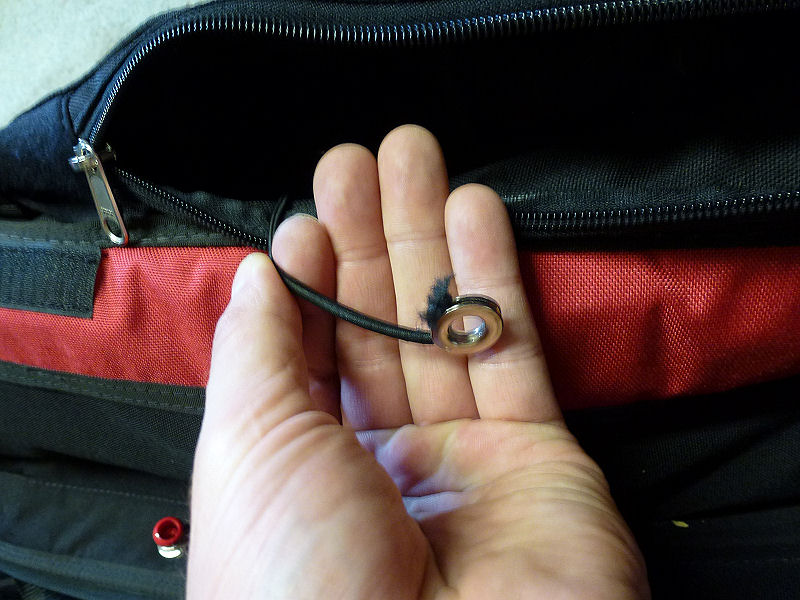
After around 8 hours, I have noticed wear points on angle of dangle adjustment cord. This is where it rubs against the eyelet that it passes through on the back of the harness.
The chute is side mounted and covered by neoprene. On my particular harness the neoprene is a little lose which makes me think the new chute packs up smaller than what I had measured for. I have also noticed from watching keel video footage that the harness slightly tips downwards on the side of the parachute. This is kind of obvious really as the weight distribution is slightly off centre - a side effect of a side mounted chute!
The workmanship of harness is superb; the material is cut to precision and the stitching, as far as I can see, is faultless.
The trick to the harness is adjustment and it takes some serious tries and re-tries to get it right! Leg loops, footplate, shoulder straps, angle of dangle cord length, all these are adjustable by either knots or adjustment straps. The manual makes some recommendations but at the end of the day, it comes down to personal choice. Get the adjustment right and this harness is exceptionally comfortable, get it wrong then you're in for pain and possibly very poor control of a glider when you need it most.
Overall, despite some initial problems, I have really taken to the Myth 3 harness. It's very competitively priced and looks the part. It comes with a fairly comprehensive manual full of photographs, a harness bag and spare pitch adjustment strap - I guess Aeros expect these to wear in time (no evidence of this after 8 hours). The harness bag does feel of a lower quality, but to date, nothing has failed on it.
So in conclusion, a very nice harness with a questionable pilot flying it for the early flights! Thank you FlyLight and Aeros - a happy customer!
Update History:


This page currently has no comments.